How to install Zabbix Agent 6 in Centos7?
$ yum update
$ yum install wget -y
$ wget https://repo.zabbix.com/zabbix/6.0/rhel/7/x86_64/zabbix-agent-6.0.0-1.el7.x86_64.rpm --no-check-certificate
$ rpm -ivh zabbix-agent-6.0.0-1.el7.x86_64.rpm
$ yum install pcre2-devel.x86_64
$ yum update
$ yum install zabbix-agent
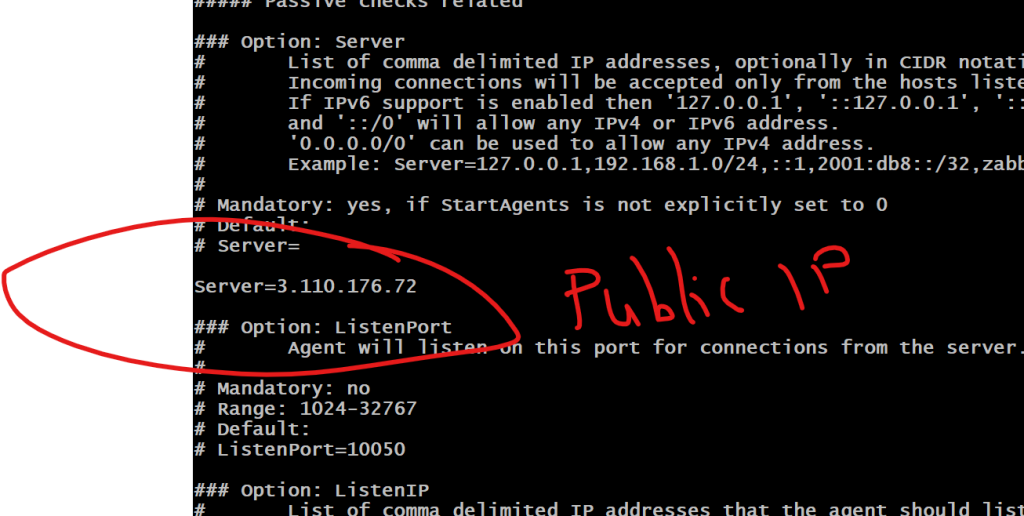
# Modify zabbix_agentd.conf with zabbix server hostname or IP
$ vi /etc/zabbix/zabbix_agentd.conf
$ service zabbix-agent start
$ systemctl enable zabbix-agent
$ service zabbix-agent restart
Zabbix Agent LogFile - /var/log/zabbix/zabbix_agentd.log
Agent Config file - /etc/zabbix/zabbix_agentd.confCode language: PHP (php)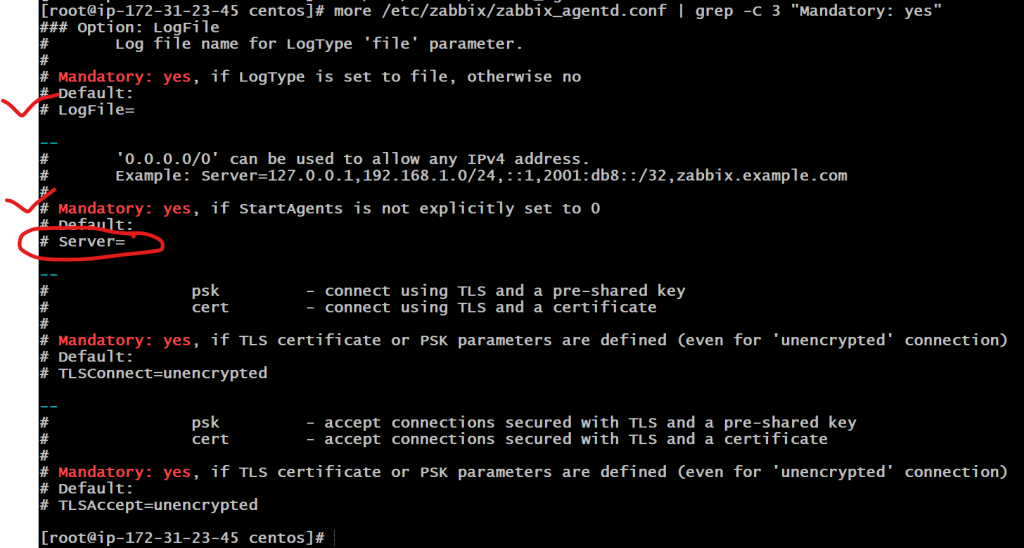

How to install Zabbix Agent 6 in Ubuntu 20?
$ wget https://repo.zabbix.com/zabbix/6.0/ubuntu/pool/main/z/zabbix-release/zabbix-release_6.0-1+ubuntu20.04_all.deb
dpkg -i zabbix-release_6.0-1+ubuntu20.04_all.deb
$ apt update && sudo apt upgrade
$ apt install zabbix-agent
$ vi /etc/zabbix/zabbix_agentd.conf
$ systemctl restart zabbix-agent
$ systemctl enable zabbix-agent

Zabbix Agent LogFile - /var/log/zabbix/zabbix_agentd.log
Agent Config file - /etc/zabbix/zabbix_agentd.conf
Code language: JavaScript (javascript)
How to install Zabbix Agent 6 in Windows 2019?
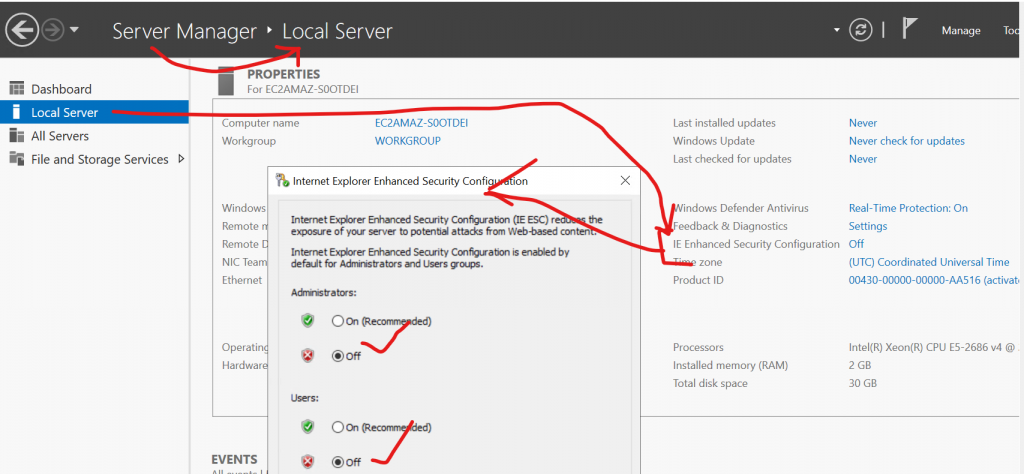
Step 1 – Disable “IE enahanced Security Configuration” in Local server so you can download file easily
Step 2 – Download a MSI file from https://www.zabbix.com/download_agents
URL for Zabbix Agent Version 6 – https://cdn.zabbix.com/zabbix/binaries/stable/6.0/6.0.1/zabbix_agent-6.0.1-windows-amd64-openssl.msi
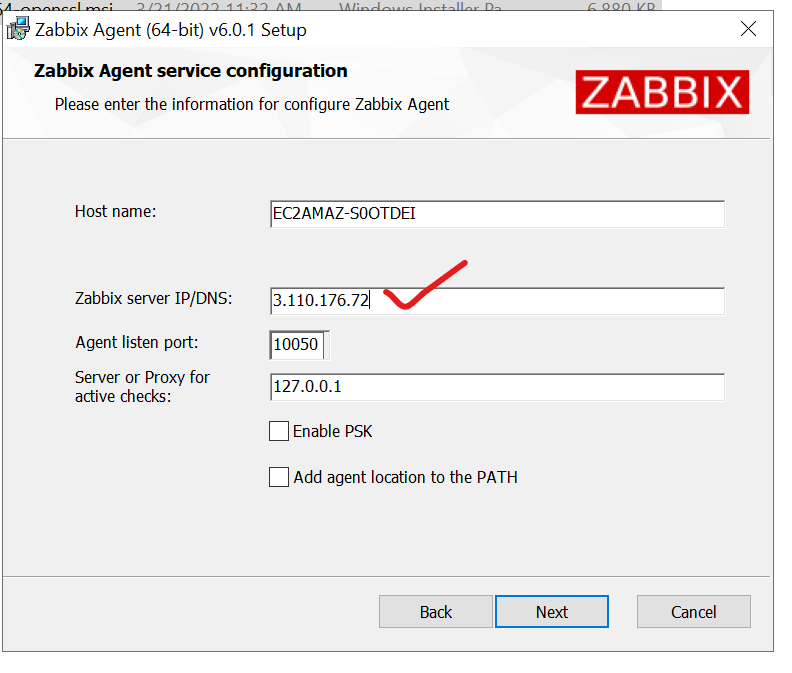
Step 3 – Install zabbix_agent-6.0.1-windows-amd64-openssl.msi with below configuration
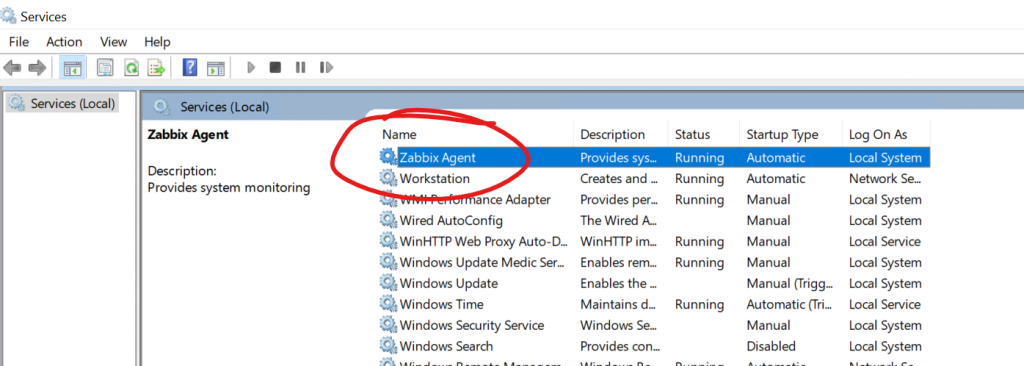
Step 4 – Check a Zabbix Agent Services is running or not
Zabbix Agent 2 Installation in Windows
Version - Zabbix agent 2 v6.0.1
Download - https://cdn.zabbix.com/zabbix/binaries/stable/6.0/6.0.1/zabbix_agent2-6.0.1-windows-amd64-openssl.msi
Code language: JavaScript (javascript)
Zabbix Agent 2 Installation in Ubuntu Linux
Version - Zabbix agent 2 v6.0.1
$ apt install zabbix-agent2

# # Modify zabbix_agent2.conf with zabbix server hostname or IP
$ vi /etc/zabbix/zabbix_agent2.conf

$ systemctl restart zabbix-agent2
Code language: PHP (php)
Zabbix Agent 2 Installation in Centos/RHEL Linux
$ yum update
$ yum install pcre2-devel.x86_64
$ yum install pcre.x86_64

$ rpm -Uvh https://repo.zabbix.com/zabbix/6.0/rhel/7/x86_64/zabbix-agent2-6.0.2-1.el7.x86_64.rpm
& yum update
$ yum install install zabbix-agent2

# Modify zabbix_agent2.conf with zabbix server hostname or IP
$ vi /etc/zabbix/zabbix_agent2.conf

$ service zabbix-agent start
$ systemctl enable zabbix-agent2
$ service zabbix-agent2 restartCode language: PHP (php)
How to add new host (zabbix agent) at Zabbix Server
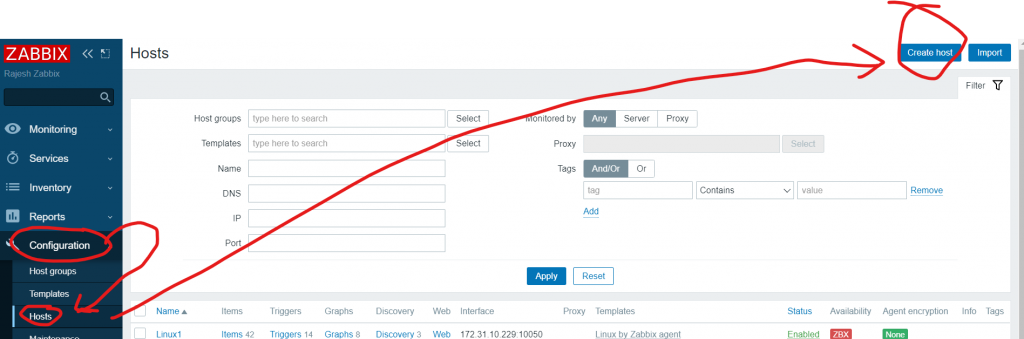
Step 1 – Configuration ==> Hosts ==> Create Host
Step 2 – Enter Follwing
- Host name -
- Templates - Linux by Zabbix Agent OR Windows by Zabbix agent
- Groups - Virtual Machine
- Interfaces - Agent

Note - Use Public IP address of Agent
Code language: PHP (php)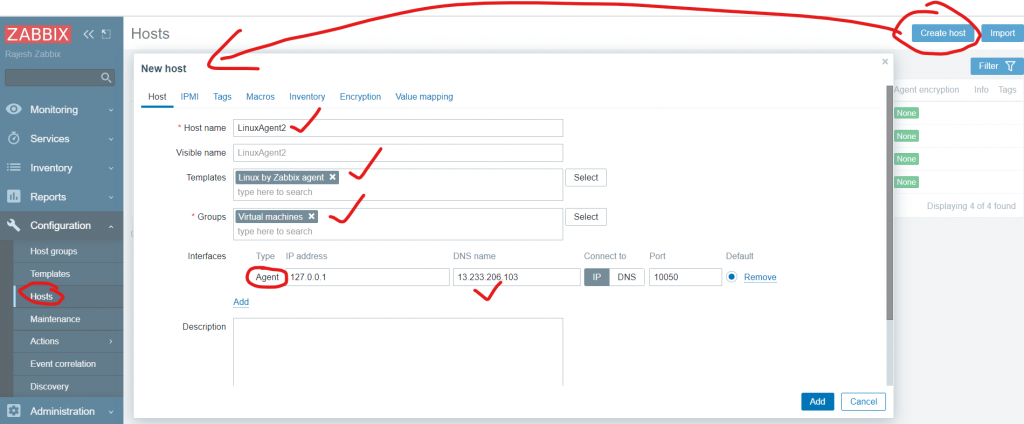
Step 3 – Wait for 60 seconds and verify as below;
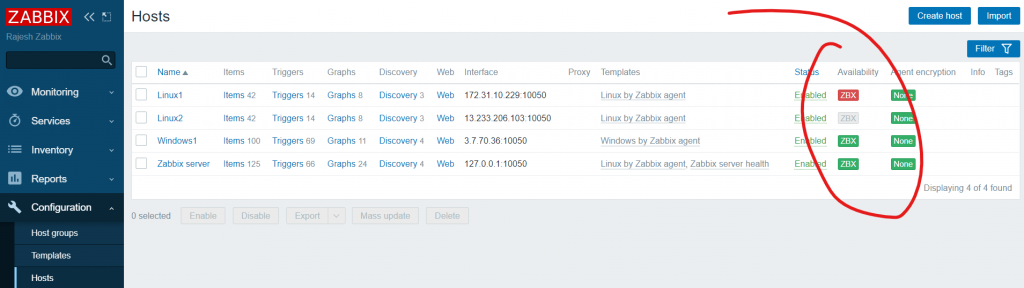
The Availability column contains indicators of host availability per each interface. We have defined a Zabbix agent interface, so we can use the agent availability icon (with ‘ZBX’ on it) to understand host availability:
 – host status has not been established; no metric check has happened yet
 – host is available, a metric check has been successful
 – host is unavailable, a metric check has failed (move your mouse cursor over the icon to see the error message). There might be some error with communication, possibly caused by incorrect interface credentials. Check that Zabbix server is running, and try refreshing the page later as well.
How to configure and deploy Zabbix passive and active agents:
- Install the Zabbix repository and the Zabbix Agent on your host
- Open the zabbix_agentd.conf configuration file
- Specify your Zabbix Server address in the Server and ServerActive parameters
- Define the name of your host in the Hostname parameter
- Restart the Zabbix Agent
- Navigate to Configuration → Hosts
- Create two hosts in Zabbix frontend – one for passive and one for active checks
- For passive Agent host – define an Agent interface containing the address of your Zabbix Server
- The active agent Host name should match the Hostname parameter value in the Agent configuration file
- Apply the corresponding Linux by Zabbix Agent/Linux by Zabbix Agent active template
- Navigate to Monitoring → Latest data and check if you have received metrics from the hosts
I’m Rajesh Kumar, a DevOps, SRE, DevSecOps, Cloud, and Platform Engineering expert passionate about sharing practical knowledge, real-world experiences, and industry best practices. I have worked at Cotocus and regularly write about technology, travel, investing, health, product reviews, and digital marketing through my various platforms.
I publish technical articles at DevOps School, travel stories at Holiday Landmark, stock market insights at Stocks Mantra, health and fitness guidance at My Medic Plus, product reviews at TrueReviewNow, and SEO and digital marketing strategies at Wizbrand.
Find Trusted Cardiac Hospitals
Compare heart hospitals by city and services — all in one place.
Explore Hospitals