In this lesson, you will learn how to create an instance of a database in the Developer Sandbox using the oc CLI tool, and ultimately bind a Node.js application to that database.
What you need to know
In order to get full benefit from this lesson you need to:
- Understand how Kubernetes is the foundational technology for OpenShift.
- Know how to access the Developer Sandbox via web browser.
- Know how to use the
ocCLI tool installed on your local computer to interact with a remote instance of the Developer Sandbox. - Understand how environment variables provide information to an application at runtime.
What you will learn
In this lesson you will learn:
- How to create an instance of a database in Developer Sandbox using the
ocCLI tool. - How to create an instance of a Node.js application from source code stored in GitHub using the
ocCLI tool. - How to bind the Node.js application to the database running in OpenShift using the
ocCLI tool.
Understand the demonstration scenario
The objective of this lesson is to demonstrate how to install and run a Node.js application bound to a database installed using the oc CLI tool. Both the Node.js application and the database will run in the Developer Sandbox.
The Node.js application publishes a web page that allows users to retrieve a name at random, then store that random name in the database to which the application is bound. Also, the Node.js application web page displays a list of names stored in the database (Figure 1).

The demonstration scenario uses a MongoDB database which you will install using the oc CLI tool. Also, you will install the Node.js application in OpenShift using the oc CLI tool.
The Node.js application has a server-side API that stores and retrieves data stored in the MongoDB database. This application also publishes a web page that is bound to the server-side API. Users interact with the page, and the page, in turn, interacts with the server-side API (Figure 2).

Node.js binds to the MongoDB database by way of a connection URL that is created by OpenShift during the database installation process. The URL contains the username and password information. You will declare the username and password information when you install the MongoDB database.
The Node.js application references the MongoDB connection URL to create a connection to the database. The way that the application knows the connection URL is by way of an environment variable that’s created as part of the process of installing Node.js in the Developer Sandbox.
In the sections that follow, you will learn how to install the MongoDB database and install the Node.js application along with the steps necessary to expose and consume the MongoDB connection URL.
Get login credentials for the OpenShift web console
In order to use the oc CLI tool to access a remote instance of the Developer Sandbox, you need to get a special set of login credentials that are available from within the OpenShift web console.
The following steps describe how to get the necessary login credentials:
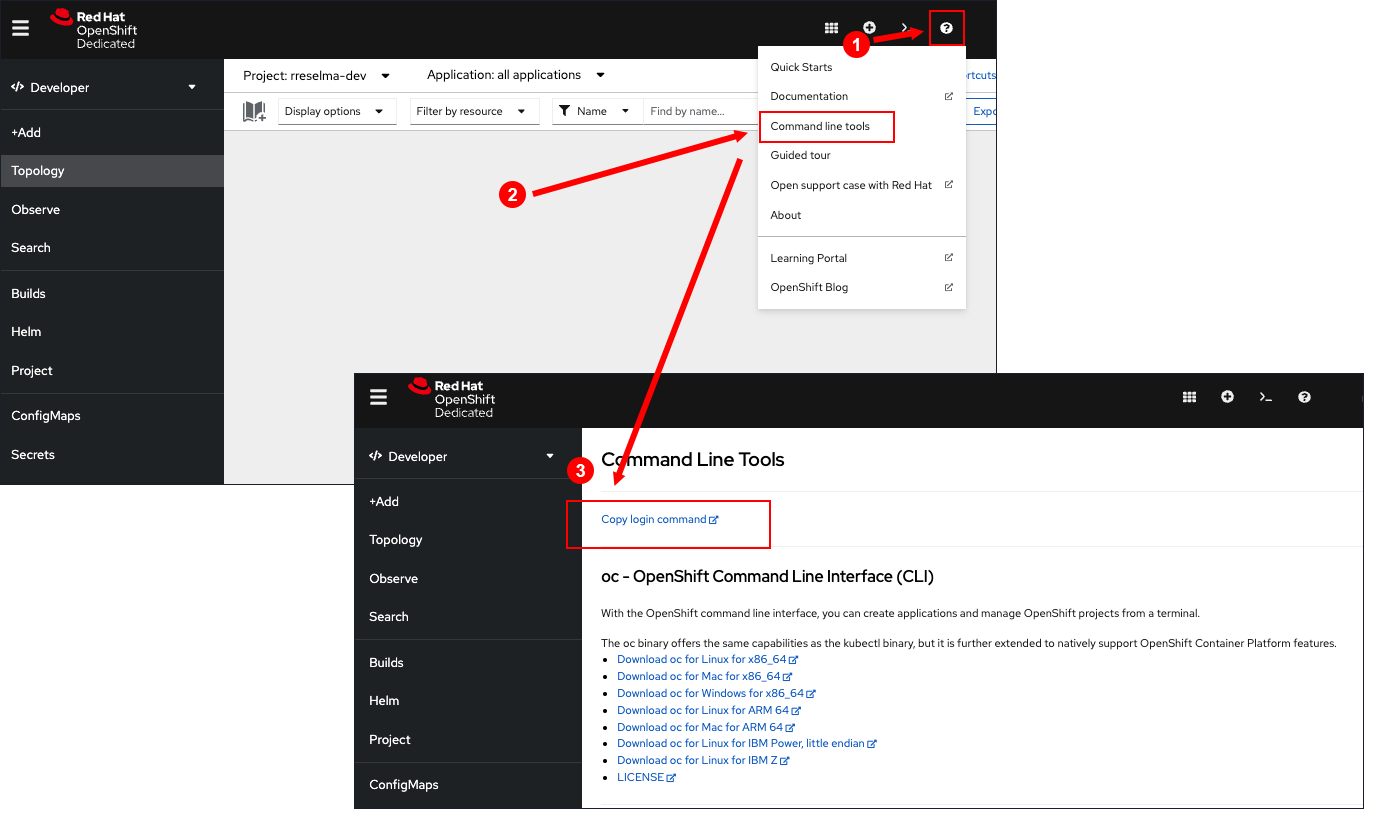
- Go to the web console for the Developer Sandbox and click the question mark in the upper right corner of the web console (Figure 3, Callout 1).
- Select Command line tools from the drop-down. This action opens the Command line tools web page (Figure 3, Callout 2).
- Select Copy command login (Figure 3, Callout 3). Figure 3: Access Command line tools by clicking the question mark in the upper right corner of the OpenShift web console.
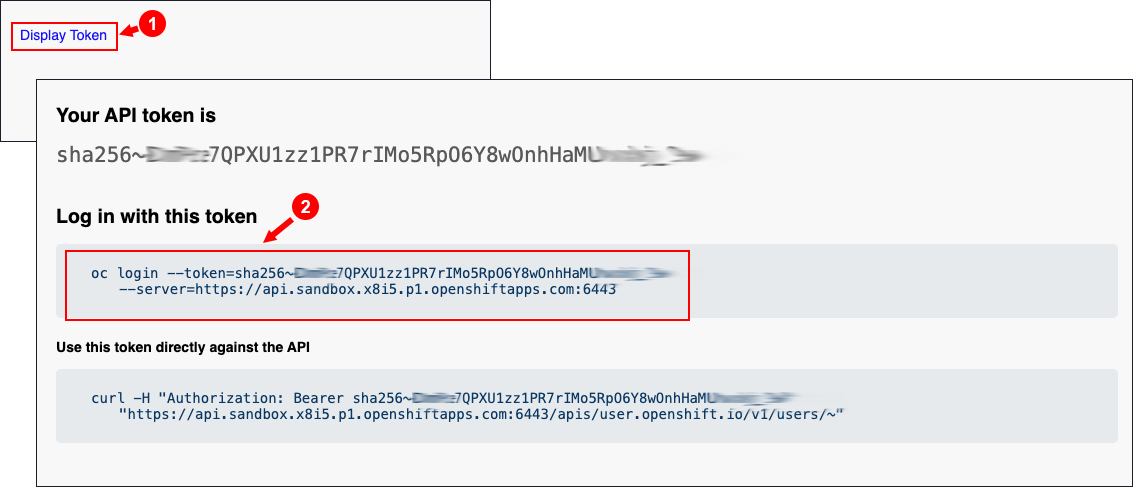
- A page with the option Display Token will appear. Select Display Token (Figure 4, Callout 1).
- A page with login credentials will appear. Copy the content of the Display Token field and paste it into the Log in with this token field (Figure 4, Callout 2). Figure 4: Clicking Display Token displays a page with login credentials.
- Go to a terminal running on your local machine and paste in the login text you copied, then select Enter to log in to the Developer Sandbox (Figure 5). Figure 5: With your login token, use the oc CLI tool to access the remote Developer Sandbox from your local machine.
Once logged in, you can do work in the remote Developer Sandbox using the oc CLI tool.
Install the database
Once you have logged into the Developer Sandbox using the oc CLI tool on your local machine, you are ready to install the database that the demonstration application will use. In this step, you will install an instance of MongoDB using an OpenShift template.
While OpenShift includes templates for multiple databases, it does not include a template for MongoDB. That’s not a problem; we can install it at the command line. First, use the following command to get the name of your project–which, in Kubernetes-speak, is the namespace:
oc get projectCode language: JavaScript (javascript)Now, use the namespace in the following commands:
oc create -f
https://raw.githubusercontent.com/openshift-labs/starter-guides/ocp-4.8/mongodb-template.yaml -n {your-namespace}

oc new-app --template=mongodb-ephemeral --param MONGODB_USER=genuser --param MONGODB_PASSWORD=password --param MONGODB_DATABASE=namegen --param NAMESPACE={your-namespace}

oc import-image mongodb:3.6
--from=registry.access.redhat.com/rhscl/mongodb-36-rhel7 --confirm -n {your-namespace}Code language: JavaScript (javascript)About these parameters:
--template=mongodb-persistentdeclares the OpenShift template to use, in this case themongodb-persistenttemplate. Themongodb-persistenttemplate creates a Kubernetes persistent volume claim (PVC) for storing database data. The data stored in the PVC will remain available even if the instance of the MongoDB database is removed from the Developer Sandbox.--param=MONGODB_USER=genuserdeclares the name of the MongoDB user who will be reading and writing to the instance of the MongoDB database running in the Developer Sandbox.--param=MONGODB_PASSWORD=passworddeclares the password for the MongoDB user who will be reading and writing to the instance of the MongoDB database running in the Developer Sandbox.--param=MONGODB_DATABASE=namegendeclares the name of the database in the MongoDB instance that will be created to store data for the demonstration application.
After you execute the command shown above, you will see output similar to this:
--> Deploying template "openshift/mongodb-persistent" to project <your_redhat-login_name>-dev

     MongoDB

     ---------

     MongoDB database service, with persistent storage. For more information about using this template, including OpenShift considerations, see documentation in the upstream repository: https://github.com/sclorg/mongodb-container.

     NOTE: Scaling to more than one replica is not supported. You must have persistent volumes available in your cluster to use this template.

     The following service(s) have been created in your project: mongodb.

            Username: genuser

            Password: password

       Database Name: namegen

      Connection URL: mongodb://genuser:password@mongodb/namegen

     For more information about using this template, including OpenShift considerations, see documentation in the upstream repository: https://github.com/sclorg/mongodb-container.

     * With parameters:

        * Memory Limit=512Mi

        * Namespace=openshift

        * Database Service Name=mongodb

        * MongoDB Connection Username=genuser

        * MongoDB Connection Password=password

        * MongoDB Database Name=namegen

        * MongoDB Admin Password=0SNxmy1woMqOuFye # generated

        * Volume Capacity=1Gi

        * Version of MongoDB Image=3.6

--> Creating resources ...

    secret "mongodb" created

    service "mongodb" created

    persistentvolumeclaim "mongodb" created

    deploymentconfig.apps.openshift.io "mongodb" created

--> Success

    Application is not exposed. You can expose services to the outside world by executing one or more of the commands below:

     'oc expose service/mongodb'

Run 'oc status' to view your app.Code language: PHP (php)After the MongoDB database is installed and running in the Developer Sandbox, you will install a Node.js application that uses the MongoDB database.
Install the Node.js application
Run the following steps in the terminal window of your local machine to install the demonstration application in the Developer Sandbox. Copy and paste the following oc new app command into the terminal on your local machine:
oc new-app https://github.com/redhat-developer-demos/namegen --name=namegen-app --env=MONGODB_URL=mongodb://genuser:password@mongodb/namegenCode language: JavaScript (javascript)About these parameters:
https://github.com/redhat-developer-demos/namegenis the location of the source code where the Node.js application is stored on GitHub. OpenShift will retrieve the source code from GitHub and use it to create a Linux container that will be part of the Kubernetes Deployment under which the application can be run in the Developer Sandbox.--name=namegen-appdeclares the name that will be associated with the Node.js application inside the Developer Sandbox/Openshift cluster.--env=MONGODB_URL=mongodb://genuser:password@mongodb/namegenuses the–envcommand-line option to declare the environment variableMONGODB_URLwhich will be injected into each container running the deployment of the Node.js application running in the Developer Sandbox/OpenShift cluster. This environment variable describes the connection URL that the Node.js application uses to connect to the instance of MongoDB that you already installed.
After you execute the command shown above, you’ll see output similar to this:
--> Found image dfd08e2 (7 months old) in image stream "openshift/nodejs" under tag "16-ubi8" for "nodejs"

    Node.js 16

    ----------

    Node.js 16 available as container is a base platform for building and running various Node.js 16 applications and frameworks. Node.js is a platform built on Chrome's JavaScript runtime for easily building fast, scalable network applications. Node.js uses an event-driven, non-blocking I/O model that makes it lightweight and efficient, perfect for data-intensive real-time applications that run across distributed devices.

    Tags: builder, nodejs, nodejs16

    * The source repository appears to match: nodejs

    * A source build using source code from https://github.com/redhat-developer-demos/namegen will be created

      * The resulting image will be pushed to image stream tag "namegen-app:latest"

      * Use 'oc start-build' to trigger a new build


--> Creating resources ...

    imagestream.image.openshift.io "namegen-app" created

    buildconfig.build.openshift.io "namegen-app" created

    deployment.apps "namegen-app" created

    service "namegen-app" created

--> Success

    Build scheduled, use 'oc logs -f buildconfig/namegen-app' to track its progress.

    Application is not exposed. You can expose services to the outside world by executing one or more of the commands below:

     'oc expose service/namegen-app'

Run 'oc status' to view your app.Code language: PHP (php)Verify the installation
At this point, the MongoDB instance and Node.js application are installed and running in the Developer Sandbox. To verify that they are indeed up and running, copy and paste the following oc status command into the terminal on your local machine:
oc statusYou will see output similar to the following, which indicates that both the MongoDB instance and Node.js namegen application are up and running:
In project <red_hat_username>-dev on server https://api.sandbox.x8i5.p1.openshiftapps.com:6443

svc/mongodb - 172.30.58.199:27017

  dc/mongodb deploys openshift/mongodb:3.6

    deployment #1 deployed 20 minutes ago - 1 pod

http://namegen-app-<red_hat_username>-dev.apps.sandbox.x8i5.p1.openshiftapps.com to pod port 8080-tcp (svc/namegen-app)

  deployment/namegen-app deploys istag/namegen-app:latest <-

    bc/namegen-app source builds https://github.com/redhat-developer-demos/namegen on openshift/nodejs:16-ubi8

    deployment #2 running for 20 minutes - 1 pod

deployment #1 deployed 20 minutes agoCode language: PHP (php)You are now ready to expose the namegen application to the internet so that it can be used in a web browser.
Expose the Node.js application to the Internet
To expose the namegen application to the Internet by using the oc expose command, copy and paste the following oc expose command into the terminal on your local machine:
oc expose service/namegen-appYou will get output similar to the following:
route.route.openshift.io/namegen-app exposedRunning oc expose creates an OpenShift route. An OpenShift route is associated with a URL that allows access to the Node.js namegen application from the internet.
Exercise the demonstration application
To exercise the demonstration application, use the oc get route command to determine the URL for the Node.js namegen application. Run the following oc get route command into the terminal on your local machine:
oc get routeCode language: JavaScript (javascript)You will get output similar to the following. Notice that the URL to the application is reported by the string in the PATH column:
NAME          HOST/PORT                                                         PATH   SERVICES      PORT       TERMINATION   WILDCARD

namegen-app   namegen-app-<your_redhat-login_name>-dev.apps.sandbox.x8i5.p1.openshiftapps.com          namegen-app   8080-tcp                 None

Code language: HTML, XML (xml)Now, copy the URL reported in the output from oc get route into the address bar on your browser. The URL you copy will be similar to the following:
namegen-app--dev.apps.sandbox.x8i5.p1.openshiftapps.com
About the parameters:
your_redhat-login_nameis your login name.apps.sandbox.x8i5.p1.openshiftapps.comrepresents a unique domain name for the particular Developer Sandbox instance. In this case, the domain name is special to the Developer Sandbox user taking this lesson.
Copying the URL that’s reported by oc get route into a web browser will render the Random Name Generator and Save window (Figure 6).

The Node.js namegen application is now up and running. You can exercise the application by selecting Get Random Name.
An automatically generated random name will appear. Select Save Name to add the newly created random name to the list of names.
Summary
In this lesson, you learned how to use the oc CLI tool to install an instance of MongoDB and a Node.js application named namegen into the Developer Sandbox and installed the MongoDB instance from an OpenShift template available in the OpenShift Developer Catalog. You also installed the Node.js application from source code stored on GitHub and learned how to configure both the MongoDB instance and Node.js application by declaring command-line options.
In addition, you used the oc expose command to create a route to the Node.js namegen application that’s accessible from the internet. Then you used the oc get route command to discover the URL created by the oc expose command.
Finally, you exercised the Node.js application by pasting the application’s URL into a web browser and interacting with the application’s web page.
I’m a DevOps/SRE/DevSecOps/Cloud Expert passionate about sharing knowledge and experiences. I have worked at Cotocus. I share tech blog at DevOps School, travel stories at Holiday Landmark, stock market tips at Stocks Mantra, health and fitness guidance at My Medic Plus, product reviews at TrueReviewNow , and SEO strategies at Wizbrand.
Do you want to learn Quantum Computing?
Please find my social handles as below;
Rajesh Kumar Personal Website
Rajesh Kumar at YOUTUBE
Rajesh Kumar at INSTAGRAM
Rajesh Kumar at X
Rajesh Kumar at FACEBOOK
Rajesh Kumar at LINKEDIN
Rajesh Kumar at WIZBRAND
Find Trusted Cardiac Hospitals
Compare heart hospitals by city and services — all in one place.
Explore Hospitals