How to install oc?
OpenShift: How to Install OpenShift CLI oc
How to login?
oc login https://api.XXXXXXXXXXXXXX.centralindia.aroapp.io:6443 --username=kubeadmin --password=EgzIY-DJPw2-3NXke-HNYmJ

oc login --token=sha256~LLnTlPcjcNjWsQRqnSyTn99LSvxwQdm47gaiEdZJa20 --server=https://api.XXXXXXXXXXXXXX.centralindia.aroapp.io:6443

curl -H "Authorization: Bearer sha256~LLnTlPcjcNjWsQRqnSyTn99LSvxwQdm47gaiEdZJa20" "https://api.XXXXXXXXXXXXXX.centralindia.aroapp.io:6443/apis/user.openshift.io/v1/users/~Code language: JavaScript (javascript)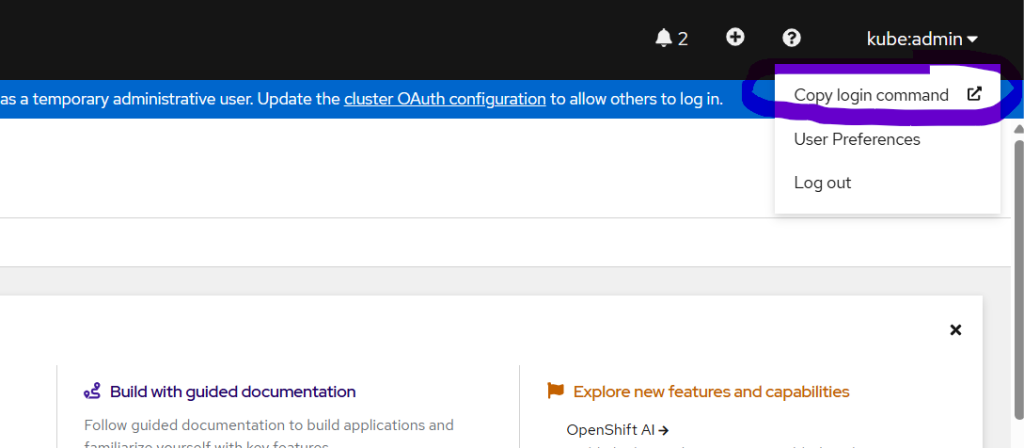
Login to the Openshift using Web Console and CLI using oc
crc console --credentials
eval $(crc oc-env)
oc login -u kubeadmin -p <password> --insecure-skip-tls-verify
Code language: JavaScript (javascript)
Copy the admin URL and kubeadmin credentials → open in browser.
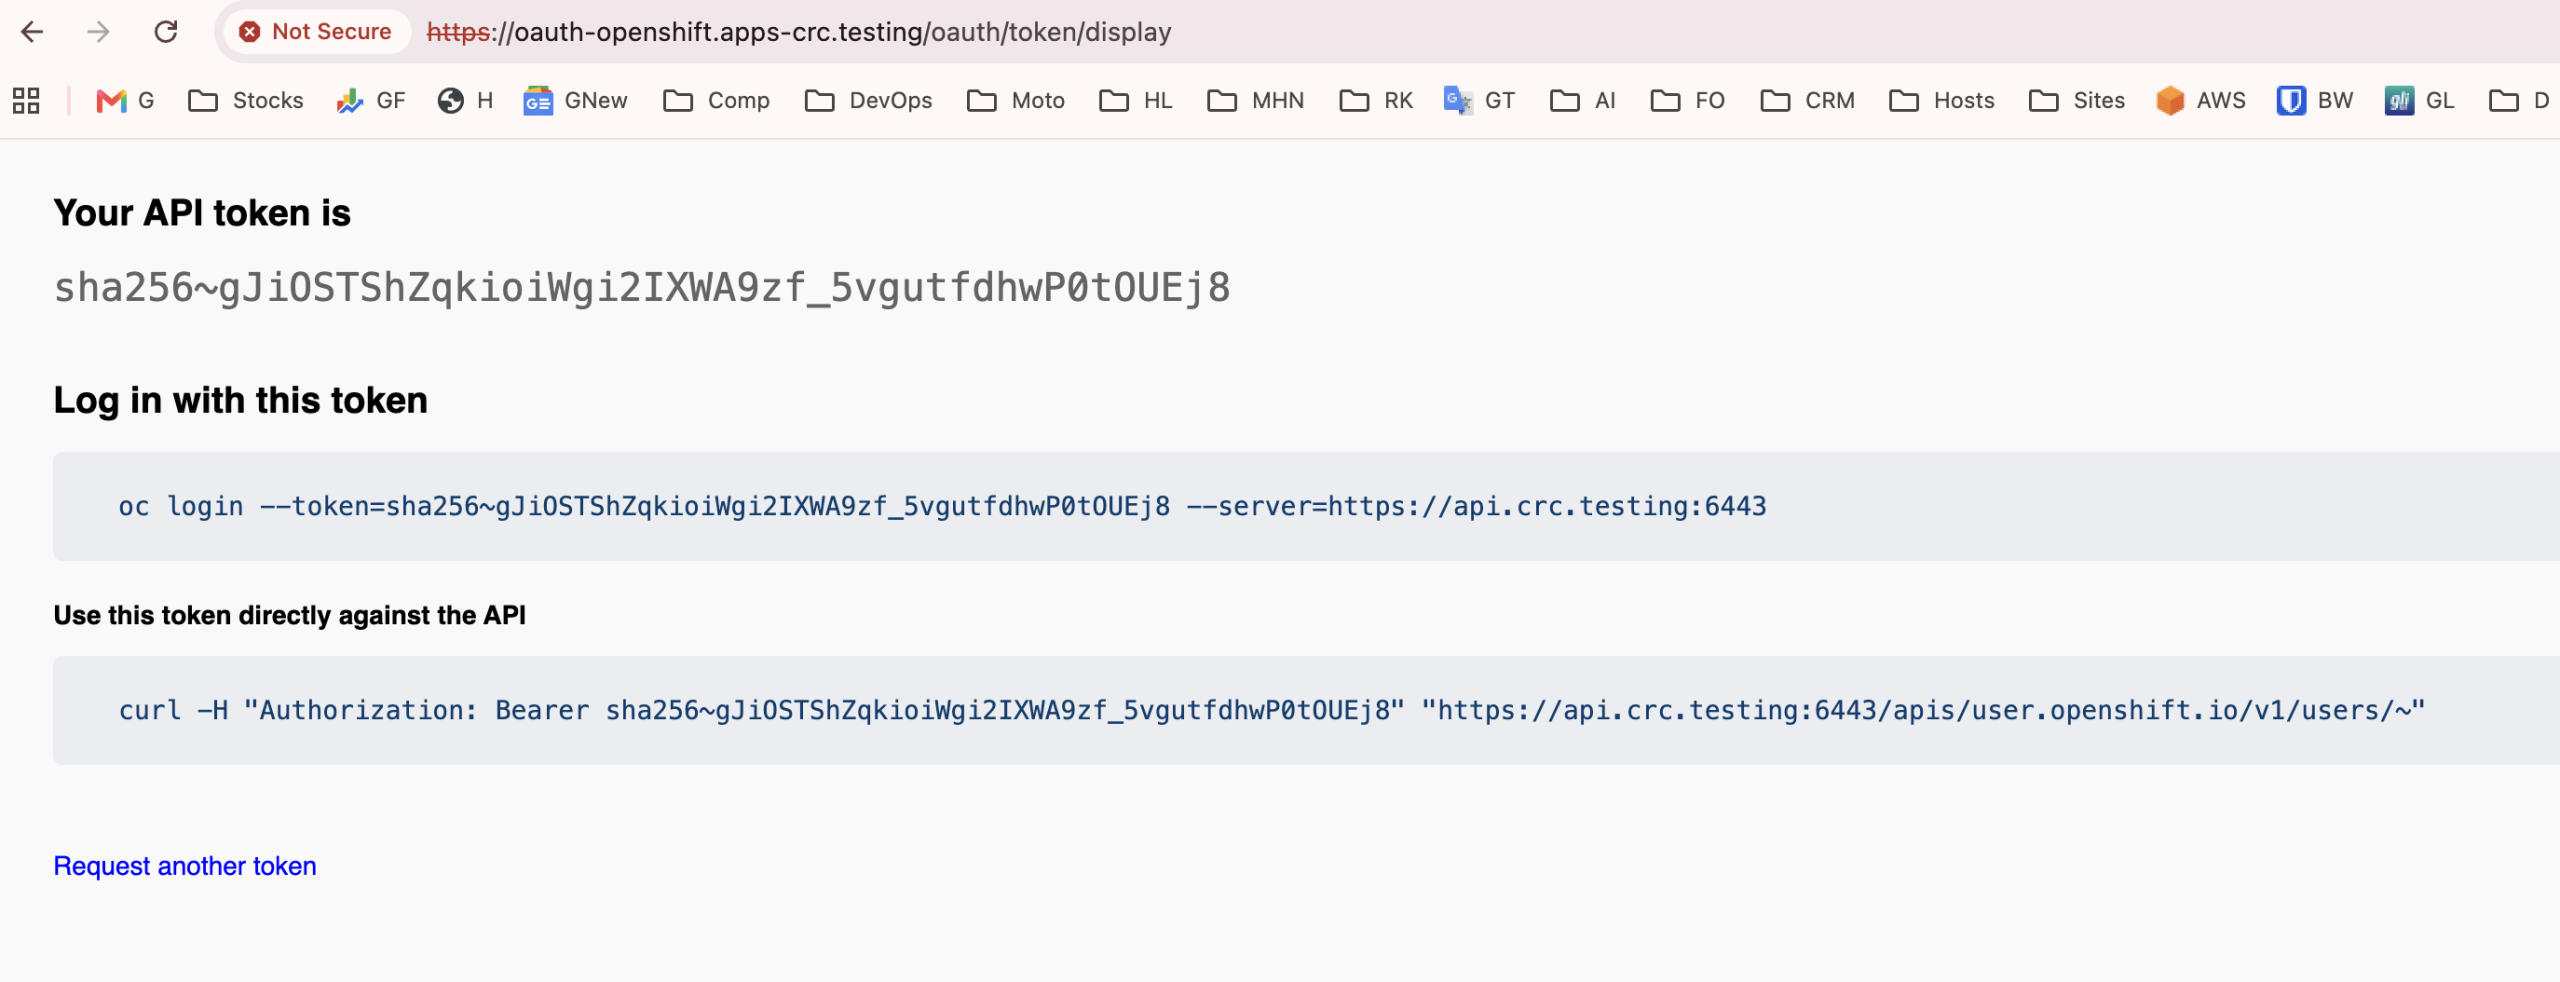
rajesh@DM-GYK3HC26H7 ~ % oc login --token=sha256~gJiOSTShZqkioiWgi2IXWA9zf_5vgutfdhwP0tOUEj8 --server=https://api.crc.testing:6443
Logged into "https://api.crc.testing:6443" as "kubeadmin" using the token provided.

You have access to 65 projects, the list has been suppressed. You can list all projects with 'oc projects'

Using project "default".
rajesh@DM-GYK3HC26H7 ~ % curl -H "Authorization: Bearer sha256~gJiOSTShZqkioiWgi2IXWA9zf_5vgutfdhwP0tOUEj8" "https://api.crc.testing:6443/apis/user.openshift.io/v1/users/~"
curl: (60) SSL certificate problem: self signed certificate in certificate chain
More details here: https://curl.se/docs/sslcerts.html

curl failed to verify the legitimacy of the server and therefore could not
establish a secure connection to it. To learn more about this situation and
how to fix it, please visit the web page mentioned above.
rajesh@DM-GYK3HC26H7 ~ % curl -k -H "Authorization: Bearer sha256~gJiOSTShZqkioiWgi2IXWA9zf_5vgutfdhwP0tOUEj8" "https://api.crc.testing:6443/apis/user.openshift.io/v1/users/~"
{
  "kind": "User",
  "apiVersion": "user.openshift.io/v1",
  "metadata": {
    "name": "kubeadmin",
    "uid": "d85326ad-0202-4285-bfd1-bb370c668bc6",
    "resourceVersion": "25096",
    "creationTimestamp": "2026-05-14T11:10:41Z",
    "managedFields": [
      {
        "manager": "oauth-server",
        "operation": "Update",
        "apiVersion": "user.openshift.io/v1",
        "time": "2026-05-14T11:10:41Z",
        "fieldsType": "FieldsV1",
        "fieldsV1": {
          "f:identities": {}
        }
      }
    ]
  },
  "identities": [
    "developer:kubeadmin"
  ],
  "groups": [
    "system:authenticated",
    "system:authenticated:oauth"
  ]
}%                                                                                                                                                                        rajesh@DM-GYK3HC26H7 ~ % Code language: PHP (php)
OpenShift Local CRC Basic Learning Workflow
World-Class Step-by-Step Lab Guide After OpenShift Local Is Running
Audience: Beginners learning OpenShift, Kubernetes, containers, deployments, services, routes, builds, jobs, storage, ConfigMaps, and Secrets.
Platform: OpenShift Local on macOS.
Assumption: OpenShift Local is already installed and started.
0. Lab Architecture
In this lab, you will use two OpenShift projects:
lab-web    -> Web apps, Deployment, Service, Route, ConfigMap, Secret, PVC
lab-batch  -> Jobs and CronJobs
This helps students understand project switching clearly.
Core learning flow:
Project
  -> Application
  -> Deployment
  -> Pod
  -> Service
  -> Route
  -> Browser / curl access
Extended learning flow:
Build from Git
  -> BuildConfig
  -> Build
  -> ImageStream
  -> Deployment
  -> Service
  -> Route
Code language: JavaScript (javascript)
Storage and configuration flow:
PersistentVolume
  -> PersistentVolumeClaim
  -> Pod mount

ConfigMap
  -> Environment variable / mounted file

Secret
  -> Sensitive environment variable / mounted file
Batch workload flow:
Job
  -> Pod
  -> Completed task

CronJob
  -> Job
  -> Pod
  -> Repeated scheduled task
1. Verify OpenShift Local Status
Run:
crc status
Expected:
CRC VM:          Running
OpenShift:       Running
If OpenShift shows Starting, wait until it becomes Running.
2. Load the OpenShift CLI Environment
Run:
eval $(crc oc-env)
Code language: JavaScript (javascript)
Verify:
oc version
You should see the OpenShift client version.
3. Get Login Credentials
Run:
crc console --credentials
Code language: JavaScript (javascript)
You should see users like:
kubeadmin
developer
For most beginner labs, use:
Username: developer
Password: developer
Code language: HTTP (http)
4. Login to OpenShift Local
Run:
oc login -u developer -p developer https://api.crc.testing:6443
Code language: JavaScript (javascript)
Verify:
oc whoami
Expected:
developer
Check the cluster API:
oc cluster-info
5. Understand Projects
In OpenShift, a project is a Kubernetes namespace with extra OpenShift features.
List projects:
oc projects
Check current project:
oc project
Create the first project:
oc new-project lab-web
Code language: JavaScript (javascript)
Create the second project:
oc new-project lab-batch
Code language: JavaScript (javascript)
Switch back to the web project:
oc project lab-web
Verify:
oc project
Expected:
Using project "lab-web"
Code language: JavaScript (javascript)
6. Project Switching Practice
Switch to lab-batch:
oc project lab-batch
Check resources:
oc get all
Code language: JavaScript (javascript)
Switch to lab-web:
oc project lab-web
Check resources:
oc get all
Code language: JavaScript (javascript)
Important rule:
Resources created in lab-web are not visible in lab-batch unless you use -A or specify the namespace.
Code language: PHP (php)
Useful cross-project commands:
oc get pods -A
oc get svc -A
oc get route -A
Code language: JavaScript (javascript)
7. Explore OpenShift ImageStreams
Switch to lab-web:
oc project lab-web
List ImageStreams available in the openshift namespace:
oc get imagestreams -n openshift
Code language: JavaScript (javascript)
Find HTTPD:
oc get imagestreams -n openshift | grep httpd
Code language: JavaScript (javascript)
Inspect the HTTPD ImageStream:
oc describe imagestream httpd -n openshift
Simple meaning:
ImageStream is an OpenShift object that tracks container image versions/tags.
8. Deploy First HTTPD Application
Deploy HTTPD from OpenShift ImageStream:
oc new-app --name=my-httpd --image-stream=openshift/httpd
Code language: JavaScript (javascript)
Check created resources:
oc get all
Code language: JavaScript (javascript)
You should see:
deployment.apps/my-httpd
replicaset.apps/my-httpd-xxxxx
pod/my-httpd-xxxxx
service/my-httpd
Check pods:
oc get pods
Code language: JavaScript (javascript)
Expected:
my-httpd-xxxxx 1/1 Running
9. Understand Deployment, ReplicaSet, Pod, and Service
Run:
oc get deployment
oc get replicaset
oc get pods
oc get svc
Code language: JavaScript (javascript)
Explanation:
Deployment  -> Desired application state
ReplicaSet  -> Maintains number of pod replicas
Pod         -> Runs the container
Service     -> Stable internal network endpoint for pods
Describe the Deployment:
oc describe deployment my-httpd
Describe the Service:
oc describe svc my-httpd
Check Service endpoints:
oc get endpoints my-httpd
Code language: JavaScript (javascript)
Expected:
my-httpd   10.x.x.x:8080
Code language: CSS (css)
If endpoints show <none>, the Service is not connected to a running pod.
10. Expose the Application Using Route
A Service is internal. To access the app from browser or curl, create a Route.
Run:
oc expose svc/my-httpd
Check Route:
oc get route my-httpd
Code language: JavaScript (javascript)
Expected:
NAME       HOST/PORT
my-httpd   my-httpd-lab-web.apps-crc.testing
Get only the URL:
oc get route my-httpd -o jsonpath='http://{.spec.host}{"\n"}'
Code language: PHP (php)
Access using curl:
curl http://$(oc get route my-httpd -o jsonpath='{.spec.host}')
Code language: JavaScript (javascript)
Or open in browser:
http://my-httpd-lab-web.apps-crc.testing
Code language: JavaScript (javascript)
11. Troubleshoot “Application Is Not Available”
If you see:
Application is not available
Run:
oc project
oc get pods
oc get svc
oc get route
oc get endpoints my-httpd
Code language: JavaScript (javascript)
Check whether route exists:
oc get route -A | grep my-httpd
Code language: JavaScript (javascript)
Check whether app is in another project:
oc get all -A | grep my-httpd
Code language: JavaScript (javascript)
Common causes:
Wrong project
Wrong route hostname
Pod not running
Service has no endpoint
Route points to wrong service
Application still starting
Useful debugging commands:
oc describe route my-httpd
oc describe svc my-httpd
oc describe deployment my-httpd
oc logs deployment/my-httpd
12. Deploy Same HTTPD App in Second Project
Now deploy the same app in another project to understand isolation.
Switch to lab-batch:
oc project lab-batch
Deploy HTTPD:
oc new-app --name=my-httpd --image-stream=openshift/httpd
Code language: JavaScript (javascript)
Expose it:
oc expose svc/my-httpd
Check route:
oc get route my-httpd
Code language: JavaScript (javascript)
You should see a different hostname:
my-httpd-lab-batch.apps-crc.testing
Code language: CSS (css)
Now compare both routes:
oc get route -A | grep my-httpd
Code language: JavaScript (javascript)
Expected:
lab-web     my-httpd   my-httpd-lab-web.apps-crc.testing
lab-batch   my-httpd   my-httpd-lab-batch.apps-crc.testing
Code language: CSS (css)
Access both:
curl http://my-httpd-lab-web.apps-crc.testing
curl http://my-httpd-lab-batch.apps-crc.testing
Code language: JavaScript (javascript)
Important learning:
Same app name can exist in different projects.
Each project gets its own namespace and route hostname.
13. Delete HTTPD from lab-batch
Keep lab-web for the rest of the labs.
Switch to lab-batch:
oc project lab-batch
Delete HTTPD resources:
oc delete all -l app=my-httpd
oc delete route my-httpd
Code language: JavaScript (javascript)
Verify:
oc get all
oc get route
Code language: JavaScript (javascript)
Switch back:
oc project lab-web
14. Scale the Application
Check current pods:
oc get pods
Code language: JavaScript (javascript)
Scale to 3 replicas:
oc scale deployment/my-httpd --replicas=3
Check pods:
oc get pods -o wide
Code language: JavaScript (javascript)
Check deployment:
oc get deployment my-httpd
Code language: JavaScript (javascript)
Scale back to 1:
oc scale deployment/my-httpd --replicas=1
Verify:
oc get pods
Code language: JavaScript (javascript)
Learning:
Deployment controls how many pod replicas should run.
15. Check Logs and Open Pod Shell
View logs from Deployment:
oc logs deployment/my-httpd
Get pod name:
oc get pods
Code language: JavaScript (javascript)
Open shell inside pod:
oc rsh deployment/my-httpd
Inside the container, run:
pwd
ls
whoami
exit
Code language: PHP (php)
Alternative command:
oc exec deployment/my-httpd -- whoami
16. Port Forward Service Locally
This is useful when Route is not working or when testing private services.
Run:
oc port-forward svc/my-httpd 18080:8080
Open another terminal and test:
curl http://localhost:18080
Code language: JavaScript (javascript)
Stop port-forward using:
Ctrl + C
17. View Application Status
Run:
oc status
This gives a human-friendly summary of the current project.
Also run:
oc get all
Code language: JavaScript (javascript)
This gives the Kubernetes/OpenShift resource view.
18. Add Labels
Add a label to the Deployment:
oc label deployment/my-httpd app-type=webserver
Check labels:
oc get deployment my-httpd --show-labels
Code language: JavaScript (javascript)
Find resources by label:
oc get deployment -l app-type=webserver
Code language: JavaScript (javascript)
Check pod labels:
oc get pods --show-labels
Code language: JavaScript (javascript)
Learning:
Labels are key-value metadata used for selection, grouping, and automation.
19. Set Resource Requests and Limits
Set CPU and memory requests/limits:
oc set resources deployment/my-httpd \
  --requests=cpu=100m,memory=128Mi \
  --limits=cpu=500m,memory=256Mi
Code language: JavaScript (javascript)
Verify:
oc describe deployment my-httpd
Check rollout:
oc rollout status deployment/my-httpd
Learning:
Requests reserve minimum resources.
Limits cap maximum resources.
20. Rollout History and Rollback
Make a visible change:
oc set env deployment/my-httpd TRAINING_VERSION=v1
Code language: JavaScript (javascript)
Check rollout:
oc rollout status deployment/my-httpd
Check rollout history:
oc rollout history deployment/my-httpd
Make another change:
oc set env deployment/my-httpd TRAINING_VERSION=v2
Code language: JavaScript (javascript)
Check environment:
oc set env deployment/my-httpd --list
Code language: JavaScript (javascript)
Rollback:
oc rollout undo deployment/my-httpd
Check again:
oc rollout status deployment/my-httpd
oc set env deployment/my-httpd --list
Code language: JavaScript (javascript)
Learning:
OpenShift/Kubernetes Deployments support rolling updates and rollback.
21. Export YAML and Apply YAML
Export Deployment YAML:
oc get deployment my-httpd -o yaml > my-httpd-deployment.yaml
Code language: JavaScript (javascript)
View file:
cat my-httpd-deployment.yaml
Code language: CSS (css)
Export Service YAML:
oc get svc my-httpd -o yaml > my-httpd-service.yaml
Code language: JavaScript (javascript)
Export Route YAML:
oc get route my-httpd -o yaml > my-httpd-route.yaml
Code language: JavaScript (javascript)
Learning:
CLI commands create resources.
YAML defines resources declaratively.
Do not blindly re-apply exported YAML without cleaning fields like:
status
resourceVersion
uid
managedFields
creationTimestamp
22. Create ConfigMap
Create a ConfigMap:
oc create configmap app-config \
  --from-literal=APP_MODE=training \
  --from-literal=WELCOME_MESSAGE="Hello from ConfigMap"
Code language: JavaScript (javascript)
Check ConfigMap:
oc get configmap
oc describe configmap app-config
Code language: JavaScript (javascript)
Inject ConfigMap values as environment variables:
oc set env deployment/my-httpd --from=configmap/app-config
Code language: JavaScript (javascript)
Verify:
oc set env deployment/my-httpd --list
Code language: JavaScript (javascript)
Check inside pod:
oc exec deployment/my-httpd -- env | grep APP_MODE
oc exec deployment/my-httpd -- env | grep WELCOME_MESSAGE
Learning:
ConfigMap stores non-sensitive configuration.
23. Create ConfigMap as a File
Create an HTML file:
cat > index.html <<'EOF'
<html>
  <body>
    <h1>Hello from OpenShift Local</h1>
    <p>This page is coming from a ConfigMap mounted into the HTTPD container.</p>
  </body>
</html>
EOF
Code language: PHP (php)
Create ConfigMap from file:
oc create configmap httpd-index --from-file=index.html
Code language: JavaScript (javascript)
Check:
oc describe configmap httpd-index
Mount ConfigMap into the HTTPD document root:
oc set volume deployment/my-httpd \
  --add \
  --name=httpd-index-volume \
  --type=configmap \
  --configmap-name=httpd-index \
  --mount-path=/var/www/html/index.html \
  --sub-path=index.html
Code language: JavaScript (javascript)
Wait for rollout:
oc rollout status deployment/my-httpd
Access route:
curl http://$(oc get route my-httpd -o jsonpath='{.spec.host}')
Code language: JavaScript (javascript)
Learning:
ConfigMaps can be consumed as environment variables or mounted as files.
Code language: JavaScript (javascript)
Note:
When using subPath, ConfigMap updates may not automatically appear in the running pod.
For beginner labs, restart the pod or rollout the deployment after updating.
24. Create Secret
Create a Secret:
oc create secret generic app-secret \
  --from-literal=DB_USER=student \
  --from-literal=DB_PASSWORD='redhat123'
Code language: JavaScript (javascript)
Check Secret:
oc get secret
oc describe secret app-secret
Code language: JavaScript (javascript)
Do not print real production secrets. This is only a lab.
Inject Secret as environment variables:
oc set env deployment/my-httpd --from=secret/app-secret --prefix=SECRET_
Code language: JavaScript (javascript)
Verify:
oc set env deployment/my-httpd --list
Code language: JavaScript (javascript)
Check inside pod:
oc exec deployment/my-httpd -- env | grep SECRET_DB_USER
Learning:
Secret stores sensitive configuration such as passwords, tokens, and keys.
Code language: JavaScript (javascript)
Important:
Secrets are not magic. Use RBAC, encryption at rest, and external secret managers for production-grade security.
Code language: PHP (php)
25. Build from Source: Git to Deployment
This lab requires internet access from the OpenShift Local VM.
Stay in lab-web:
oc project lab-web
Deploy from Git using Source-to-Image:
oc new-app https://github.com/sclorg/nodejs-ex --name=nodejs-ex
Code language: JavaScript (javascript)
Check generated objects:
oc get all
oc get buildconfig
oc get builds
oc get imagestream
Code language: JavaScript (javascript)
Follow the build logs:
oc logs -f bc/nodejs-ex
If build log command does not work, list builds:
oc get builds
Code language: JavaScript (javascript)
Then run:
oc logs -f build/nodejs-ex-1
Expose the app:
oc expose svc/nodejs-ex
Check route:
oc get route nodejs-ex
Code language: JavaScript (javascript)
Access:
curl http://$(oc get route nodejs-ex -o jsonpath='{.spec.host}')
Code language: JavaScript (javascript)
Learning:
Git repository
  -> BuildConfig
  -> Build
  -> ImageStream
  -> Deployment
  -> Service
  -> Route
26. Rebuild Source App
Start a new build:
oc start-build nodejs-ex
Follow build:
oc start-build nodejs-ex --follow
Check builds:
oc get builds
Code language: JavaScript (javascript)
Check deployment:
oc get deployment
Code language: JavaScript (javascript)
Check pods:
oc get pods
Code language: JavaScript (javascript)
Learning:
BuildConfig defines how source code becomes a runnable image.
27. Create a Simple Job
Switch to batch project:
oc project lab-batch
Create a Job:
oc create job hello-job \
  --image=registry.access.redhat.com/ubi9/ubi-minimal \
  -- /bin/sh -c 'date; echo "Hello from OpenShift Job"; sleep 5; echo "Job completed"'
Code language: JavaScript (javascript)
Check Job:
oc get jobs
Code language: JavaScript (javascript)
Check pods:
oc get pods
Code language: JavaScript (javascript)
View logs:
oc logs job/hello-job
Describe Job:
oc describe job hello-job
Learning:
Job runs a task to completion.
It is suitable for one-time batch tasks.
Clean up:
oc delete job hello-job
Code language: JavaScript (javascript)
28. Create a CronJob
Create a CronJob that runs every minute:
oc create cronjob hello-cron \
  --image=registry.access.redhat.com/ubi9/ubi-minimal \
  --schedule='*/1 * * * *' \
  -- /bin/sh -c 'date; echo "Hello from OpenShift CronJob"'
Code language: JavaScript (javascript)
Check CronJob:
oc get cronjob
Code language: JavaScript (javascript)
Wait for a minute, then check Jobs:
oc get jobs
Code language: JavaScript (javascript)
Check pods:
oc get pods
Code language: JavaScript (javascript)
View logs from the latest job pod:
oc logs $(oc get pods --sort-by=.metadata.creationTimestamp -o name | tail -1)
Code language: JavaScript (javascript)
Suspend CronJob:
oc patch cronjob hello-cron -p '{"spec":{"suspend":true}}'
Code language: JavaScript (javascript)
Verify:
oc get cronjob hello-cron
Code language: JavaScript (javascript)
Resume CronJob:
oc patch cronjob hello-cron -p '{"spec":{"suspend":false}}'
Code language: JavaScript (javascript)
Delete CronJob:
oc delete cronjob hello-cron
Code language: JavaScript (javascript)
Delete old Jobs if any remain:
oc delete jobs --all
Code language: JavaScript (javascript)
Learning:
CronJob creates Jobs on a schedule.
Use it for scheduled tasks such as reports, cleanup, and backups.
Code language: JavaScript (javascript)
29. Persistent Storage: Check StorageClass
Switch to lab-web:
oc project lab-web
Check StorageClass:
oc get storageclass
Code language: JavaScript (javascript)
You should usually see a default storage class in OpenShift Local.
If no default StorageClass exists, your PVC may stay Pending.
30. Create PVC
Create a PVC:
cat > pvc.yaml <<'EOF'
apiVersion: v1
kind: PersistentVolumeClaim
metadata:
  name: data-pvc
spec:
  accessModes:
    - ReadWriteOnce
  resources:
    requests:
      storage: 1Gi
EOF
Code language: JavaScript (javascript)
Apply:
oc apply -f pvc.yaml
Code language: CSS (css)
Check:
oc get pvc
Code language: JavaScript (javascript)
Expected:
data-pvc Bound
If it stays Pending:
oc describe pvc data-pvc
oc get storageclass
Code language: JavaScript (javascript)
If your StorageClass has a specific name, update the PVC like this:
storageClassName: <your-storage-class-name>
Code language: HTML, XML (xml)
31. Use PVC in a Deployment
Create Deployment that writes data into PVC:
cat > pvc-demo.yaml <<'EOF'
apiVersion: apps/v1
kind: Deployment
metadata:
  name: pvc-demo
spec:
  replicas: 1
  selector:
    matchLabels:
      app: pvc-demo
  template:
    metadata:
      labels:
        app: pvc-demo
    spec:
      containers:
        - name: writer
          image: registry.access.redhat.com/ubi9/ubi-minimal
          command:
            - /bin/sh
            - -c
          args:
            - while true; do date >> /data/visits.log; sleep 10; done
          volumeMounts:
            - name: data
              mountPath: /data
      volumes:
        - name: data
          persistentVolumeClaim:
            claimName: data-pvc
EOF
Code language: PHP (php)
Apply:
oc apply -f pvc-demo.yaml
Code language: CSS (css)
Check:
oc get pods
oc get pvc
Code language: JavaScript (javascript)
Read file from the pod:
POD=$(oc get pod -l app=pvc-demo -o jsonpath='{.items[0].metadata.name}')
oc exec $POD -- tail -5 /data/visits.log
Code language: PHP (php)
Delete pod:
oc delete pod $POD
Code language: JavaScript (javascript)
Wait for new pod:
oc get pods -w
Code language: JavaScript (javascript)
Stop watch with:
Ctrl + C
Check data again:
NEWPOD=$(oc get pod -l app=pvc-demo -o jsonpath='{.items[0].metadata.name}')
oc exec $NEWPOD -- tail -5 /data/visits.log
Code language: PHP (php)
Learning:
Pod was deleted, but data survived because it was stored in PVC.
32. Understand PV and PVC
Check PVC:
oc get pvc
Code language: JavaScript (javascript)
Check PV:
oc get pv
Code language: JavaScript (javascript)
Describe PVC:
oc describe pvc data-pvc
Simple meaning:
PV  = Storage available in the cluster
PVC = Request for storage from a project/application
Pod = Uses PVC as a volume
Code language: JavaScript (javascript)
33. Create Manual Deployment, Service, and Route
This lab teaches the difference between oc new-app and manual object creation.
Switch to lab-web:
oc project lab-web
Create a Deployment manually:
cat > manual-httpd.yaml <<'EOF'
apiVersion: apps/v1
kind: Deployment
metadata:
  name: manual-httpd
spec:
  replicas: 1
  selector:
    matchLabels:
      app: manual-httpd
  template:
    metadata:
      labels:
        app: manual-httpd
    spec:
      containers:
        - name: httpd
          image: image-registry.openshift-image-registry.svc:5000/openshift/httpd:latest
          ports:
            - containerPort: 8080
EOF
Code language: JavaScript (javascript)
Apply:
oc apply -f manual-httpd.yaml
Code language: CSS (css)
If the internal image tag latest does not exist, check available tags:
oc describe imagestream httpd -n openshift
Then replace latest with an available tag such as:
2.4-ubi9
Code language: CSS (css)
Check pod:
oc get pods -l app=manual-httpd
Code language: JavaScript (javascript)
Create Service:
oc expose deployment/manual-httpd --port=8080 --target-port=8080
Check Service:
oc get svc manual-httpd
oc get endpoints manual-httpd
Code language: JavaScript (javascript)
Create Route:
oc expose svc/manual-httpd
Check Route:
oc get route manual-httpd
Code language: JavaScript (javascript)
Access:
curl http://$(oc get route manual-httpd -o jsonpath='{.spec.host}')
Code language: JavaScript (javascript)
Learning:
oc new-app creates several objects automatically.
Manual YAML helps you understand each object clearly.
Code language: JavaScript (javascript)
34. Readiness and Liveness Probes
Add readiness probe:
oc set probe deployment/my-httpd \
  --readiness \
  --get-url=http://:8080/
Code language: JavaScript (javascript)
Add liveness probe:
oc set probe deployment/my-httpd \
  --liveness \
  --get-url=http://:8080/
Code language: JavaScript (javascript)
Check rollout:
oc rollout status deployment/my-httpd
Describe pod:
oc describe pod $(oc get pod -l deployment=my-httpd -o jsonpath='{.items[0].metadata.name}')
Code language: PHP (php)
Learning:
Readiness probe decides whether pod should receive traffic.
Liveness probe decides whether pod should be restarted.
35. Events and Troubleshooting
View events:
oc get events --sort-by=.lastTimestamp
Code language: JavaScript (javascript)
Watch pods:
oc get pods -w
Code language: JavaScript (javascript)
Describe failed pod:
oc describe pod <pod-name>
Code language: HTML, XML (xml)
View logs:
oc logs <pod-name>
Code language: HTML, XML (xml)
Previous container logs:
oc logs <pod-name> --previous
Code language: HTML, XML (xml)
Check all resources:
oc get all
Code language: JavaScript (javascript)
Common troubleshooting chain:
Route
  -> Service
  -> Endpoints
  -> Pod
  -> Container logs
  -> Events
Commands:
oc get route
oc get svc
oc get endpoints
oc get pods
oc logs deployment/my-httpd
oc get events --sort-by=.lastTimestamp
Code language: JavaScript (javascript)
36. Web Console Practice
Open console:
crc console
Code language: JavaScript (javascript)
Or show credentials:
crc console --credentials
Code language: JavaScript (javascript)
In the console:
1. Login as developer
2. Switch to Developer perspective
3. Select lab-web project
4. Go to Topology
5. Click my-httpd
6. Check Route, Pods, Logs, Events
7. Switch to lab-batch
8. Check Jobs and CronJobs
Code language: PHP (php)
Learning:
CLI gives speed.
Web console gives visual understanding.
Use both.
Code language: JavaScript (javascript)
37. RBAC and Permissions Basics
Check what you can do:
oc auth can-i create pods
oc auth can-i create deployments
oc auth can-i create routes
oc auth can-i get secrets
Code language: JavaScript (javascript)
Check who can view pods:
oc policy who-can get pods
Code language: JavaScript (javascript)
Check current user:
oc whoami
Learning:
RBAC controls who can perform actions on resources.
38. Useful OpenShift Discovery Commands
Find API resources:
oc api-resources
Find route resource:
oc api-resources | grep route
Find job resources:
oc api-resources | grep job
Explain a resource:
oc explain deployment
oc explain deployment.spec
oc explain service
oc explain route
oc explain cronjob
Code language: CSS (css)
39. Compare Current Project vs All Projects
Current project only:
oc get pods
oc get svc
oc get route
Code language: JavaScript (javascript)
All projects:
oc get pods -A
oc get svc -A
oc get route -A
Code language: JavaScript (javascript)
Find all HTTPD resources:
oc get all -A | grep httpd
Code language: JavaScript (javascript)
Find all routes:
oc get route -A
Code language: JavaScript (javascript)
Learning:
Most beginner confusion comes from being in the wrong project.
Always run oc project when confused.
Code language: JavaScript (javascript)
40. Complete Lab Review
At this point, you have practiced:
Project creation and switching
Application deployment
Deployment
ReplicaSet
Pod
Service
Route
Expose
Scaling
Logs
Pod shell
Port forward
Labels
Resource requests and limits
Rollout and rollback
YAML export/apply
ConfigMap
Secret
Build from Git
BuildConfig
ImageStream
Job
CronJob
PVC
PV
Web Console
RBAC basics
Troubleshooting
Cleanup
Code language: JavaScript (javascript)
41. Clean Up Application Resources Only
Switch to lab-web:
oc project lab-web
Delete HTTPD app:
oc delete all -l app=my-httpd
oc delete route my-httpd
Code language: JavaScript (javascript)
Delete Node.js app:
oc delete all -l app=nodejs-ex
oc delete route nodejs-ex
Code language: JavaScript (javascript)
Delete PVC demo:
oc delete deployment pvc-demo
oc delete pvc data-pvc
Code language: JavaScript (javascript)
Delete manual app:
oc delete deployment manual-httpd
oc delete svc manual-httpd
oc delete route manual-httpd
Code language: JavaScript (javascript)
Delete ConfigMaps and Secrets:
oc delete configmap app-config httpd-index
oc delete secret app-secret
Code language: JavaScript (javascript)
Switch to lab-batch:
oc project lab-batch
Delete batch resources:
oc delete jobs --all
oc delete cronjobs --all
Code language: JavaScript (javascript)
42. Clean Up Projects
Delete both lab projects:
oc delete project lab-web
oc delete project lab-batch
Code language: JavaScript (javascript)
Verify:
oc projects
43. Final One-Page Command Summary
crc status
eval $(crc oc-env)
crc console --credentials
oc login -u developer -p developer https://api.crc.testing:6443

oc new-project lab-web
oc new-project lab-batch

oc project lab-web
oc get imagestreams -n openshift
oc new-app --name=my-httpd --image-stream=openshift/httpd
oc get all
oc expose svc/my-httpd
oc get route my-httpd
curl http://$(oc get route my-httpd -o jsonpath='{.spec.host}')

oc scale deployment/my-httpd --replicas=3
oc get pods
oc scale deployment/my-httpd --replicas=1

oc logs deployment/my-httpd
oc rsh deployment/my-httpd

oc create configmap app-config --from-literal=APP_MODE=training
oc set env deployment/my-httpd --from=configmap/app-config

oc create secret generic app-secret --from-literal=DB_PASSWORD='redhat123'
oc set env deployment/my-httpd --from=secret/app-secret --prefix=SECRET_

oc new-app https://github.com/sclorg/nodejs-ex --name=nodejs-ex
oc logs -f bc/nodejs-ex
oc expose svc/nodejs-ex
curl http://$(oc get route nodejs-ex -o jsonpath='{.spec.host}')

oc project lab-batch
oc create job hello-job --image=registry.access.redhat.com/ubi9/ubi-minimal -- /bin/sh -c 'date; echo hello'
oc logs job/hello-job

oc create cronjob hello-cron --image=registry.access.redhat.com/ubi9/ubi-minimal --schedule='*/1 * * * *' -- /bin/sh -c 'date; echo cron'
oc get cronjob
oc get jobs

oc project lab-web
oc get storageclass
oc apply -f pvc.yaml
oc get pvc
oc apply -f pvc-demo.yaml

oc get pods -A
oc get route -A
oc get all -A | grep httpd

oc delete project lab-web lab-batch
Code language: PHP (php)
44. Key Mental Model
Project
  contains application resources

ImageStream
  tracks image versions

Deployment
  defines desired application state

ReplicaSet
  maintains replicas

Pod
  runs container

Service
  gives stable internal access

Route
  gives external browser access

BuildConfig
  defines how source code becomes an image

Job
  runs one-time task

CronJob
  runs scheduled task

PVC
  requests persistent storage

ConfigMap
  stores non-sensitive config

Secret
  stores sensitive config
45. Recommended Teaching Order
Use this order in class:
1. Login and CLI setup
2. Projects and switching
3. HTTPD app from ImageStream
4. Service and Route
5. Troubleshooting route/service/pod
6. Deploy same app in second project
7. Scaling and logs
8. ConfigMap
9. Secret
10. Build from Git
11. Jobs
12. CronJobs
13. PVC/PV
14. YAML and rollout
15. Cleanup
Code language: JavaScript (javascript)
46. Important Notes for Students
Do not create too many projects without naming discipline.
Always check oc project.
Always use oc get route -A if you cannot find your URL.
A Service is internal.
A Route is external.
A Pod can die and come back.
A Deployment keeps the app alive.
A PVC keeps data beyond pod restart.
A Job finishes.
A CronJob repeats.
A ConfigMap is not for passwords.
A Secret is for sensitive data, but production secret security needs RBAC and encryption.
Code language: PHP (php)
47. Best Beginner Troubleshooting Command Set
When lost, run:
oc project
oc get all
oc get route
oc get endpoints
oc get events --sort-by=.lastTimestamp
Code language: JavaScript (javascript)
When project confusion happens, run:
oc get all -A | grep <app-name>
oc get route -A | grep <app-name>
Code language: HTML, XML (xml)
When app does not open, run:
oc get route
oc describe route <route-name>
oc get svc
oc describe svc <service-name>
oc get endpoints <service-name>
oc get pods
oc logs deployment/<deployment-name>
Code language: HTML, XML (xml)
48. Final Outcome
After completing this lab, students should be comfortable with:
OpenShift Local daily workflow
oc CLI basics
Project switching
Application deployment
Service and Route access
Build from source
Deployment lifecycle
Config and Secret injection
Batch and scheduled jobs
Persistent storage basics
Troubleshooting
Cleanup
Code language: JavaScript (javascript)
This is the right foundation before moving into:
Helm
Kustomize
Operators
OpenShift Pipelines
GitOps
Monitoring
Ingress/TLS
RBAC deep dive
NetworkPolicy
Stateful applications
Production OpenShift architecture
I’m Rajesh Kumar, a DevOps, SRE, DevSecOps, Cloud, and Platform Engineering expert passionate about sharing practical knowledge, real-world experiences, and industry best practices. I have worked at Cotocus and regularly write about technology, travel, investing, health, product reviews, and digital marketing through my various platforms.
I publish technical articles at DevOps School, travel stories at Holiday Landmark, stock market insights at Stocks Mantra, health and fitness guidance at My Medic Plus, product reviews at TrueReviewNow, and SEO and digital marketing strategies at Wizbrand.
Find Trusted Cardiac Hospitals
Compare heart hospitals by city and services — all in one place.
Explore Hospitals
The article does a nice job of explaining the CRC learning workflow, but it could also highlight some practical considerations for teams preparing to deploy on larger OpenShift environments. Since CRC runs as a single-node cluster with limited resources, certain networking, scaling, and high-availability scenarios cannot be fully tested locally. Including guidance on maintaining environment consistency through GitOps and validating configurations in CI/CD pipelines would help bridge the gap between local development and production deployments.